
In this article we will walk through a physical to virtual migration of a Windows 2012+ physical system to Nutanix Acropolis Hypervisor (AHV). To perform this we are using HYCU Data Protection which is a complete backup and recovery solution for Nutanix (AHV, ESXi, Physical Windows).
By the end of this blog you should have a complete understanding of the step by step process to perform this P2V.
FUN FACT: This was all done via a GUI and is a very simple process, by the end of the migration our VM will be running on Nutanix AHV will be automatically backed up via a HYCU default backup policy!
Prereq(s):
Download and install the Nutanix VirtIO drivers on the Physical windows machine (IF YOU DO NOT DO THIS THE WINDOWS VM WILL NOT BOOT ON AHV, WE NEED THE VIRTUAL DRIVERS)We also need an SMB share connected as a Target, I have usedNutanix Filesto add a backup SMB share as a target.Lastly we need a Nutanix Cluster as a Source so we have a place to restore to AHV as a VM
Step One – Preparing/Backing Up the Physical Machine
1.) Now that we have the VirtIO drivers installed on our Windows 2012 physical machine we need to add this machine to our HYCU Backup Controller. To do this log into your HYCU Backup Controller and go to Sources from the gear dropdown.

2.) Next click the Tab for Physical Machines then click + New

3.) Add a Name and IP Address

4.) To track progress go to Jobs and verify the source was added successfully

5.) Next we need to add a credential in order to successfully log into the Windows physical machine in order to load the HYCU agent into memory, perform the backup, remove the agent, and complete the full backup progress. To do this, select your physical machine and click Credential

6.) If you already have a credential (in this case I did) then select it and click Assign

7.) Now with the physical machine selected click Backup (in this case I am forcing a Full backup). Then click Yes


8.) Now go back to Jobs and watch the progress. Once complete move onto Step Two.


Step Two – Restoring the Physical Machine to Nutanix AHV
1.) Now go back to the Virtual Machines menu and click your physical machine to highlight it and click Restore VM

2.) Note that we have multiple options here. For this example we will select Clone VM to build an entirely new VM on AHV. Click Next

3.) Select the appropriate Storage Container and give your new VM a VM Name then click Restore

4.) Go back to Jobs and watch the progress. Once complete move onto Step Three

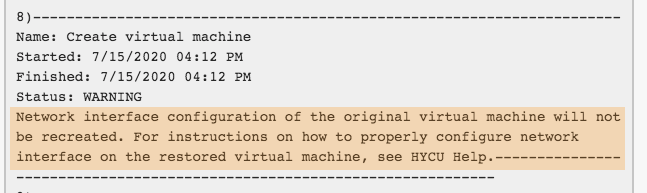
Step Three – Add Networking and Validate AHV VM
- When we restore a physical machine to AHV we no longer know the correct network to add to so we need to add a new vNIC to this VM. To do this login to Prism and go to the VM Page
2.) Select your new VM and click Update

3.) Scroll down to Network Adapters and click + Add New NIC

4.) Select the appropriate virtual network click Add


5.) Click Save

5.) Now Power on your VM and validate all services and applications are operational!
BONUS
Wrapping up our “Fun Fact” from the beginning of this article, note that my VM which was created upon Restore has already been backed up the minute HYCU detected a new VM on the AHV cluster. Doesn’t get much easier than that to protect our data!!
