
In the most recent AOS LTS version 6.5 Metro Availability was added to further enhance resiliency against a total site failure by using synchronous replication coupled with witness network failure detection inside Prism Central.
This post will explain how to easily setup Metro Availability for AHV.
For more details see the link below…
Requirements:
- Prism Central on a tertiary cluster (handles the Witness service)
- Primary Source cluster
- Secondary Target cluster
In my environment we are using a lab so my Prism Central is running on the Target cluster (this is NOT what we want to do in a production environment).
Below you can see we have two clusters.

NOTE: Prism Central needs to be managing both clusters. We can not have two Prism Centrals used for an AHV Metro configuration
Setting up AHV Metro:
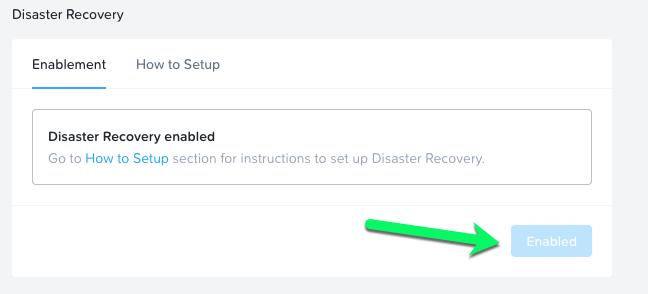
Enable Disaster Recovery:
1. First we need to ensure DR is enabled in Prism Central. Go to Settings –> Enable Disaster Recovery
Setup Protection Policy:
2. Next we need a Protection Policy. For this go to Data Protection –> Protection Policies. Click Create Protection Policy

3. Next pick your Primary Location. In my lab this would be my cluster named PHX-SPOC006-3 and click Save.

4. Next pick your Recovery Location. In my lab this would be my cluster named PHX-SPOC006-4 and click Save.

5. Now add the schedule. Click + Add Schedule.

Select Synchronous and Automatic Failover

6. Lastly, select the Categories you want to be in the Metro Availability setup. Then click Create.

7. At this point you should see any VM inside the selected Category begin replicating.

Setup Recovery Plan:
Now that we have a Protection Policy we need a Recovery Plan for the Witness to automatically kick off when failures are seen.
8. Go to Data Protection –> Recovery Plan. Click Create Recovery Plan

9. Now configure the following
Locations
- Primary Location
- Local AZ
- Primary Cluster
- Recovery Location
- Local AZ
- Recovery Cluster
Failure Execution Method
- Automatic

Click Next
10. Now we need to add our VMs to the Recovery Plan.
Click + Add VM(s)

From here select either VMs by name or the Categories you want included

Click Add
Click Next
11. Lastly configure the Network Mapping. This will make sure that upon failover, the VM NICs are added to the correct networks.
NOTE: If the two clusters are both in the same Layer 2 network we can enable Stretched Network which will also allow for Live Migration between clusters so we can keep workloads online in the event we need to do some planned maintenance.

Click Done
Conclusion
In 11 easy steps you have now quickly setup AHV Metro availability. We now can handle automatic failover in the event there is a critical failure of the primary cluster.
In a followup article I will walk through a failure scenario to show off the automatic failure handling with AHV Metro Availability.
Thanks!!